How to measure kitchen cabinets
How to measure your kitchen cabinets
.png)
This article covers measuring your kitchen. This is the second stage of our three stage design process, the first being to choose which cabinets and finish you like. Once you measure, you can use our articles or our unique personal design service to plan the layout. This will then dictate which cabinets and accessories need to be ordered. We will walk you through the whole process.
If you have already planned a kitchen cabinet layout, or you are simply replacing your existing kitchen cabinet layout exactly as it is now, or you have had someone come in to measure already, simply fax or mail what you have so far and we will complete and refine the design if necessary and complete your order in quickly and easily.
Please keep in mind that if you are altering the structure, or wall layout of the kitchen, it is important to be sure you are not compromising the structural integrity of the space. If you are unsure of which walls are "load bearing" or you are moving windows, doorways, or opening archways, or removing walls entirely, it is a good idea to check with an engineer or architect. Obviously, we cannot be responsible for any problems that arise structurally since we are not measuring the space ourselves. Please remember to keep tension on your tape measure as they tend to "belly" or sag over long distances effecting the measurement. Kitchen cabinet measurements are done in inches.
.png)
1- Begin with a piece of graph paper or print the grid here. Sketch out the basic shape of the kitchen. While this does not have to be to scale, it is helpful to keep to some guidelines - eg. 1 box is 6" or 12".
2- Measure each outside wall's total length from one corner to the other. No space is absolutely square, so take 3 measurements of each wall; one from the floor, one mid way up, and one at the ceiling. The smallest measurement is the one to work with.
3- Sketch in windows, doors, interior walls, recessed areas, protrusions, islands, peninsulas, or other features. Artistic talent doesn't matter here - the accuracy of the measurements does.
4- Measure the widths of each feature in inches. For windows and doors, measure to the outside edges of surrounding trim.
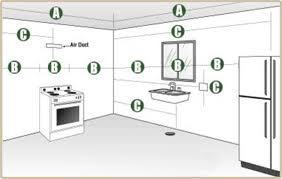
5- Mark the locations of where the appliances will go, as well as where the current gas, water, and electric lines are located. If you are putting in new appliances, try to have the widths of any new stoves, dishwashers, and refrigerators ready at the time of design. (Aside from Microwaves, most appliances are fairly standard in widths: 30" or 36" for stoves, cook tops may be 42' or 48", 24" for dishwashers, 15" or 18" for trash compactors, and 30" to 36" for refrigerators - or up to 48" for built-ins). Be sure to include new services such as a water line for an icemaker, or under cabinet outlets for water filters, wine keepers, or garbage disposals.
6- Measure each wall section from the corner to the feature (doorway, window etc.), and from feature to feature. For the sink measure from the corner to the middle of the sink be sure that all of these sections add up to the total length of the wall.
7- For height, measure from floor to ceiling in several places and use the smaller measurement. For vaulted or offset ceilings, record the increased height at the point in the diagram where the higher ceiling begins. Remember to include any soffits, measuring both height and depth, as the cabinets will be mounted below.
8- Using a "$" symbol or a different color, mark the current location of any switches or outlets.
At this point, we need to take what the existing space offers and begin to think about all of the possibilities.
Sharing in :

Comments
Telka , One of the largest manufacturers of wood
The shop all goods and services, are required to have the necessary permits from the relevant authorities and the activities of this site are subject to the laws and regulations of the Islamic Republic of Iran.